-
FEATURED IN OUR SUMMER ISSUE
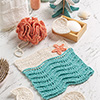
Designs by Adriana Baiocco
This set of a washcloth, bath pouf and makeup removers is easy and fast to make. Basic ...
-

FEATURED IN OUR SUMMER ISSUE
Design by Debra Arch
Wood bead accents convey a trendy '70s vibe on this lightweight triangular bandanna, which ...
-
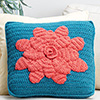
FEATURED IN OUR SUMMER ISSUE
Design by Kristen Stoltzus Clay
A single large flower adds a vibrant pop of color to this easy pillow cover. Make it in ...
-
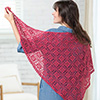
FEATURED IN OUR SUMMER ISSUE
Design by Nazanin S. Fard
Made up of beautiful join-as-you-go motifs, this shawl will make an elegant accessory for ...
-
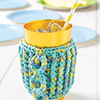
FEATURED IN OUR SUMMER ISSUE
Design by Debra Arch
Bulky-weight cotton yarn absorbs condensation on cold drinks while a hand strap allows a ...
-

FEATURED IN OUR SUMMER ISSUE
Design by Melissa Hassler
Bring the relaxing and calming vibes of the tropics into your home with this bohemian ...
-
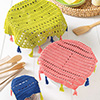
FEATURED IN OUR SUMMER ISSUE
Design by Dana Hogan of Day's Crochet
Add style to your picnic decor with this trio of covers worked in simple stitches.
-
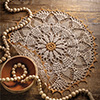
FEATURED IN OUR SUMMER ISSUE
Design by Olga Shalaeva
This vintage-style crochet doily will be a beautiful accent on any table.
-
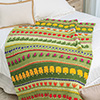
FEATURED IN OUR SUMMER ISSUE
Design by Rena V. Stevens
Inspired by the Fair Isle style of knitting, bands of whimsical, highly textured floral ...
-
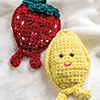
FEATURED IN OUR SUMMER ISSUE
Design by Jennifer E. Ryan
With some simple stitches and luxurious velvet yarn, you can quickly create these adorable ...
-

FEATURED IN OUR SUMMER ISSUE
Design by Donna Childs
Inspired by gingham tablecloths, this is a fun and easy pillow to crochet using classic ...
-
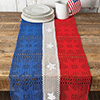
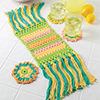
FEATURED IN OUR SUMMER ISSUE
Design by Joyce Geisler
This is a fun, festive runner that can be worked in the traditional red, white and blue or ...
-
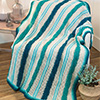
FEATURED IN OUR SUMMER ISSUE
Design by Kathleen Berlew
This breezy, textured throw will be at home on the beach, dock or pool deck. Its rustic ...
-

FEATURED IN OUR SUMMER ISSUE
Design by Chelsea Roberts of The Crafter Life
The adjustable tail fin strap has two buttonholes, allowing you to attach it to the arm of ...
-
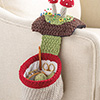
FEATURED IN OUR SUMMER ISSUE
Design by Dana Rebmann for Yarnovations.com
This adorable pincushion is the perfect accessory for your workspace, ...
-

FEATURED IN OUR SUMMER ISSUE
Design by Fat Lady Crochet
These friendly looking ocean pals work up quickly with this easy design. Work with cotton ...
-
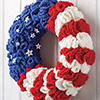
FEATURED IN OUR SUMMER ISSUE
Design by Agnes Russell
Celebrate the Fourth of July by dressing up your home with this delightful, decorative ...
-
FEATURED IN OUR SUMMER ISSUE
Design by Britt Schmiesing
Add style to your picnic decor with this trio of covers worked in simple stitches.
-
FEATURED IN OUR SUMMER ISSUE
Design by Iassia Kryvonos
This bright and fun outfit will make your tiny prickly pear cute as can be with its ...
-

FEATURED IN OUR SUMMER ISSUE
Design by Geraldine Freedman
Wear this comfortable cardigan on a cool summer evening when headed out to the beach or ...
-
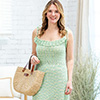
FEATURED IN OUR SUMMER ISSUE
Design by Patricia Bonghi
This sundress made in gentle sea colors reflects a cool ocean vibe. Wear it to the beach ...
-
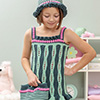
FEATURED IN OUR SUMMER ISSUE
Design by Lisa Bell
Basic stitches take interesting twists and turns to create these ...
-

FEATURED IN OUR SUMMER ISSUE
Design by Laura Gebhardt
Dress up your outfit with this cute vest or you can even wear it over a swimsuit at the ...
-

FEATURED IN OUR SUMMER ISSUE
Design by Rebecca J. Venton
Simple crochet stitches meet fun applique in this beautiful afghan that reflects the ...
-
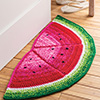
FEATURED IN OUR SUMMER ISSUE
Design by Heidi Yates
Work up this sweet project to add the vibrance of summer to any room in your house.


Follow Us On ...